Categories
Monitors
Operators, parts manuals and X20/X30 monitor updates are available in the service section under product downloads. Also manuals for older equipment are one step further under other products.
Vansco
- How to wire the monitor into tractor
- Turning on monitor
- Checking firm ware version
- When powering up the version number will briefly display.
- How to enter your seeder width
- How to set speed
- How to learn a new system
- How to re-learn a system
- Wiring schematics (part numbers for new pins and connectors)
- How do I set-up my Morris Vansco Monitor
Topcon X20
- How to install monitor including interface
- Three power wires from tractor harness plus power harness for X20 hook direct to 12 volt batteries.
- Tractor harness hooks to interface box (large white plug).
- 9 pin serial cable hooks interface box to X20 monitor port 3.
- How to check the monitor version or firm ware version on interface and MDECU
- In the seeder screen, touch the Topcon logo in upper right corner and it will display the software version and if the unit is registered.
- How to set the monitor up for air tank and width of the drill
- Download the Topcon X20 setup manual. This is a step-by-step manual on how to set-up your monitor.
- How to select a product for each tank
- Touch the tank you would like to put product in and on the right hand side there will be a spot to select product.
- How to fill tanks
- Touch the tank you would like to fill and on the top right there will be a fill button. Touch this button and you can fill or add desired weight.
- How to set seeding rates one and two and increment
- Touch the tank you would like to set rates on and on the right hand side the rates will come up and if you touch them, they will allow you to change the rates.
- Tanks calibrations of product
- Make sure proper gear ratio is entered 2 for direct drive and 16 for slow speed drive. Make sure hair pin is in proper location on transmission. Directly on orbit motor for direct drive and opposite location for slow speed.
- Tank that you what to calibrate has to be shut off and a desired application rate must be entered into preset rate 1 before you can calibrate. Touch the tank you what to calibrate and on the top right hand side a cal button will appear. Touch this button and it will allow you to start calibration. With the run reset switch on the tank.
- Turn to run. This will prime the metering wheels.
- Turn to stop.
- Press and hold the rest button. This will reset the monitor test weigh back to zero.
- Place empty collection tray under tank and turn switch to run and fill 3/4 full.
- Weigh box and minus empty box weight and go enter into monitor.
- Do at least twice or until satisfied.
- You will never get it to a percentage difference of zero.
- How to add a product to product list
- In the change and view configuration menu you can adjust product lists.
- How to hook up GPS from other monitor
- The X20 monitor needs a GPS input of 5 hertz and 19200 baud rate with VTG and GGA NMEA strings. Match baud rate to GPS.
- The 9 pin serial connector will be plugged into the y cable into coms 1 and 2.
- How to activate blockage on monitor
- In the change and view configuration menu under monitoring.
- How to add cameras to X20 monitor
- Have the steering and guidance icon open on startup screen.
- Allow unit to open.
- Have Ag Cam USB plugged into X20.
- Press the exit / off button in the steering guidance screen.
- Press register button.
- Register Ag Cam.
- A code will come up and you will have to have your dealer call this code into Morris and wait for a password.
- The X20 cannot be shut off till you enter the password. If the monitor is shut off, the code will change and a new password will be needed.
- You can run the seeder screen white waiting for the password.
- How to perform a firm ware update
- Place USB stick into port.
- Turn on monitor and at the progress bar press stop.
- Press upgrade.
- If USB is not detected, try another port. There are four.
- Select yes to all.
Topcon X30
- How to install monitor including IB1
- Power and ground must hook direct to battery. NOTE: Some tractors are 24 volt systems on one side. Do not hook to the 24 volt side as this will burn out the monitor.
- Make sure all wires are free of pinch points and are tied up and put away where they won’t get stepped on or caught in someone’s feet.
- The IB1 needs to be put away where it will not get stepped on or kicked / tripped over, but easily accessible.
- How to check monitor version or firm ware version including IB1 and MDECU
- Turn the X30 monitor on.
- When it powers up, touch on the Topcon Logo off the seeder page and the firm ware page will come up and tell you the X30, IB1 and MDECU and 30S firm ware version.
- How to set monitor up for air tank and width of drill
- You will need to go to your Operator’s Manual and go to the section labeled that describes your air cart: two, three, or four tank.
- How to select a product for each tank
- Refer to Section 5 and 6 of your Operator’s Manual.
- How to fill tanks
- How to set seeding rates one and two and increment
- Refer to Section 6 of your Operator’s Manual.
- Tanks calibrations of product
- First you need fan hydraulics running then use flow divider to shut the fan off. This allows the VRT block to still get oil flow to run.
- Then make sure there is product in tank and entered in the monitor and there is also a rate 1 and 2 entered.
- On the monitor you will have to go to Global Home Screen and pick Calibration screen then make sure you have a manual speed and symbol is green. If symbol is grey then it is not active. Touch the manual speed button and it will turn green then activate the tank.
- Then you want to calibrate. Calibration symbol then Automatic Calibration. Then just do what the screen says and follow yellow arrows.
- Next screen makes sure the state is on (GREEN). Keep following the arrows.
- How to add a product to product list
- Refer to Section 5 of your Operator’s Manual.
- How to hook up GPS from other monitor
- This depends on the monitor and GPS system.
- Refer to Section 14 of your Operator’s Manual.
- How to activate blockage on monitor
- You need to be on the setup page.
- Go to implement, then seeder, then monitoring the blocked head monitor, then enable the block head monitor.
- Then block head sensor type (STNDARD), then head monitoring, then select single-shoot or double-shoot (select whatever system you have).
- Then enable head systems (select both seed and fertilizer, or just seed, or just fertilizer).
- Then number of distribution heads, and enter the number of divider heads.
- Then on the right hand side of screen, one or two columns seed heads and fertilizer. Touch on the name head and rename to whatever works for the individual.
- Wiring schematics (part numbers for new pins and connectors)
- How to perform a firm ware update including IB1
- It is recommended to update the X30 monitor first and the IB1 second.
- Power down monitor then unhook the 4 pin connector on the IB1 insert memory stick.
- Turn on monitor and memory stick should flash three quick times, and then will flash slow.
- It will take 5 to 10 minutes and you have to watch the light on IB1. When it pauses, remove the memory stick.
- Update is complete.
- Power down the X30 monitor, then hook the 4 pin connector back up on IB1 and power the X30 back up.
- Check firm ware on X30 and the IB1 to confirm update is successful.
Eagle
- How to install monitor
- Hook power directly to 12 volt battery.
- How to check monitor version or firm ware version
- Firm ware version is on start-up screen.
- How to set monitor up for air tank and width of drill
- Refer to your Owner’s Manual, Chapter 3
- How to select a product for each tank
- Refer to your Owner’s Manual, Chapter 4
- How to fill tanks
- Refer to your Owner’s Manual, Chapter 7.1
- How to set seeding rates one and two and increment
- Refer to your Owner’s Manual, Chapter 7.9
- Tanks calibrations of product
- Refer to your Owner’s Manual, Chapters 3.5.3, and 4.2.1
- How to add a product to product list
- Refer to your Owner’s Manual
- How to hook up GPS from other monitor
- Refer to your Owner’s Manual, Chapter 3.2.4
- How to activate blockage on monitor
- Refer to your Owner’s manual, Chapter 3.5.2
Agtron
- Blockage
- How to run Agtron blockage through Topcon monitor (X30 OR X20)
- The X30 can use Agtron blockage, via a CAN-ART system
- For more information on the CAN-ART System
- Refer to the CAN-ART Manual on how to use it
Programming
- X20 not registering wheel speed
- Make sure X20 is set at speed for seeder.
- Check that sensor gap is as tight as possible.
- Try a different sensor off cart.
- *Note: All sensors are the same on the VRT Topcon
- X20 gear ratio alarms
- When this happens it is pointing to the sensor on the metering shaft or the sensor on 72 tooth sprocket.
- One of the sensors is not gapped properly (adjust sensor as close as possible).
- If the gap is correct, then one of the sensors has failed.
- Can try a sensor off another tank.
- How do you learn the version 3 monitor
- Unhook all sensors with monitor off.
- Turn the monitor on and proceed to learn the new system.
- Hook sensors up in the order they come up on the screen.
- Run / reset switch does not work
- Has to be activated in the monitor
Hydraulics
- Single fan hydraulic routing and pressure and flow requirements
- 21 GPM and 2750 PSI
- Dual fan hydraulic routing and pressure and flow requirements
- 42 GPM and 2750 PSI
- VRT hydraulic routing and oil requirements direction the metering wheels are to turn
- 5 GPM and 2750 PSI
- Hydraulic auger
- 20 GPM and 2500 PSI
- Hydraulic conveyor
- 21 GPM and 2500 PSI
- Hydraulic assist for auger
- Air Seeder Auger = .5 GPM and 1000 PSI (the auger is only 3 – 4 feet)
- Main Auger = 14′ auger that carries the grain up the side of the cart is different
- Hydraulic assist for conveyor
- .5 GPM and 1000 PSI
- How to operate the service bleed off hydraulic valve on C 2 and C 1
- Hydraulic pressure setting for ICT hydraulic valve
- 1 GPM 300 PSI
Calibration
VRT Cart X20
- How to set air cart up for calibration on a VRT
Standard Drive Cart
- How to set air cart up for calibration on standard drive
- Use charts as a starting point that are on the side of the cart.
- Calibration for 8XL Series Air Cart
- Calibration for 9 Series Air Cart
- How many cranks are required to equal 1/10 acre
- In the Operator’s Manual under Section 12 it shows you how to come up with an accurate crank value.
X30
- How to set up multi-tank calibration for X30
Electrical
Operators, parts manuals and X20/X30 monitor updates are available in the service section under product downloads. Also manuals for older equipment are one step further under other products.
- Monitor is on but not reading any of the sensors
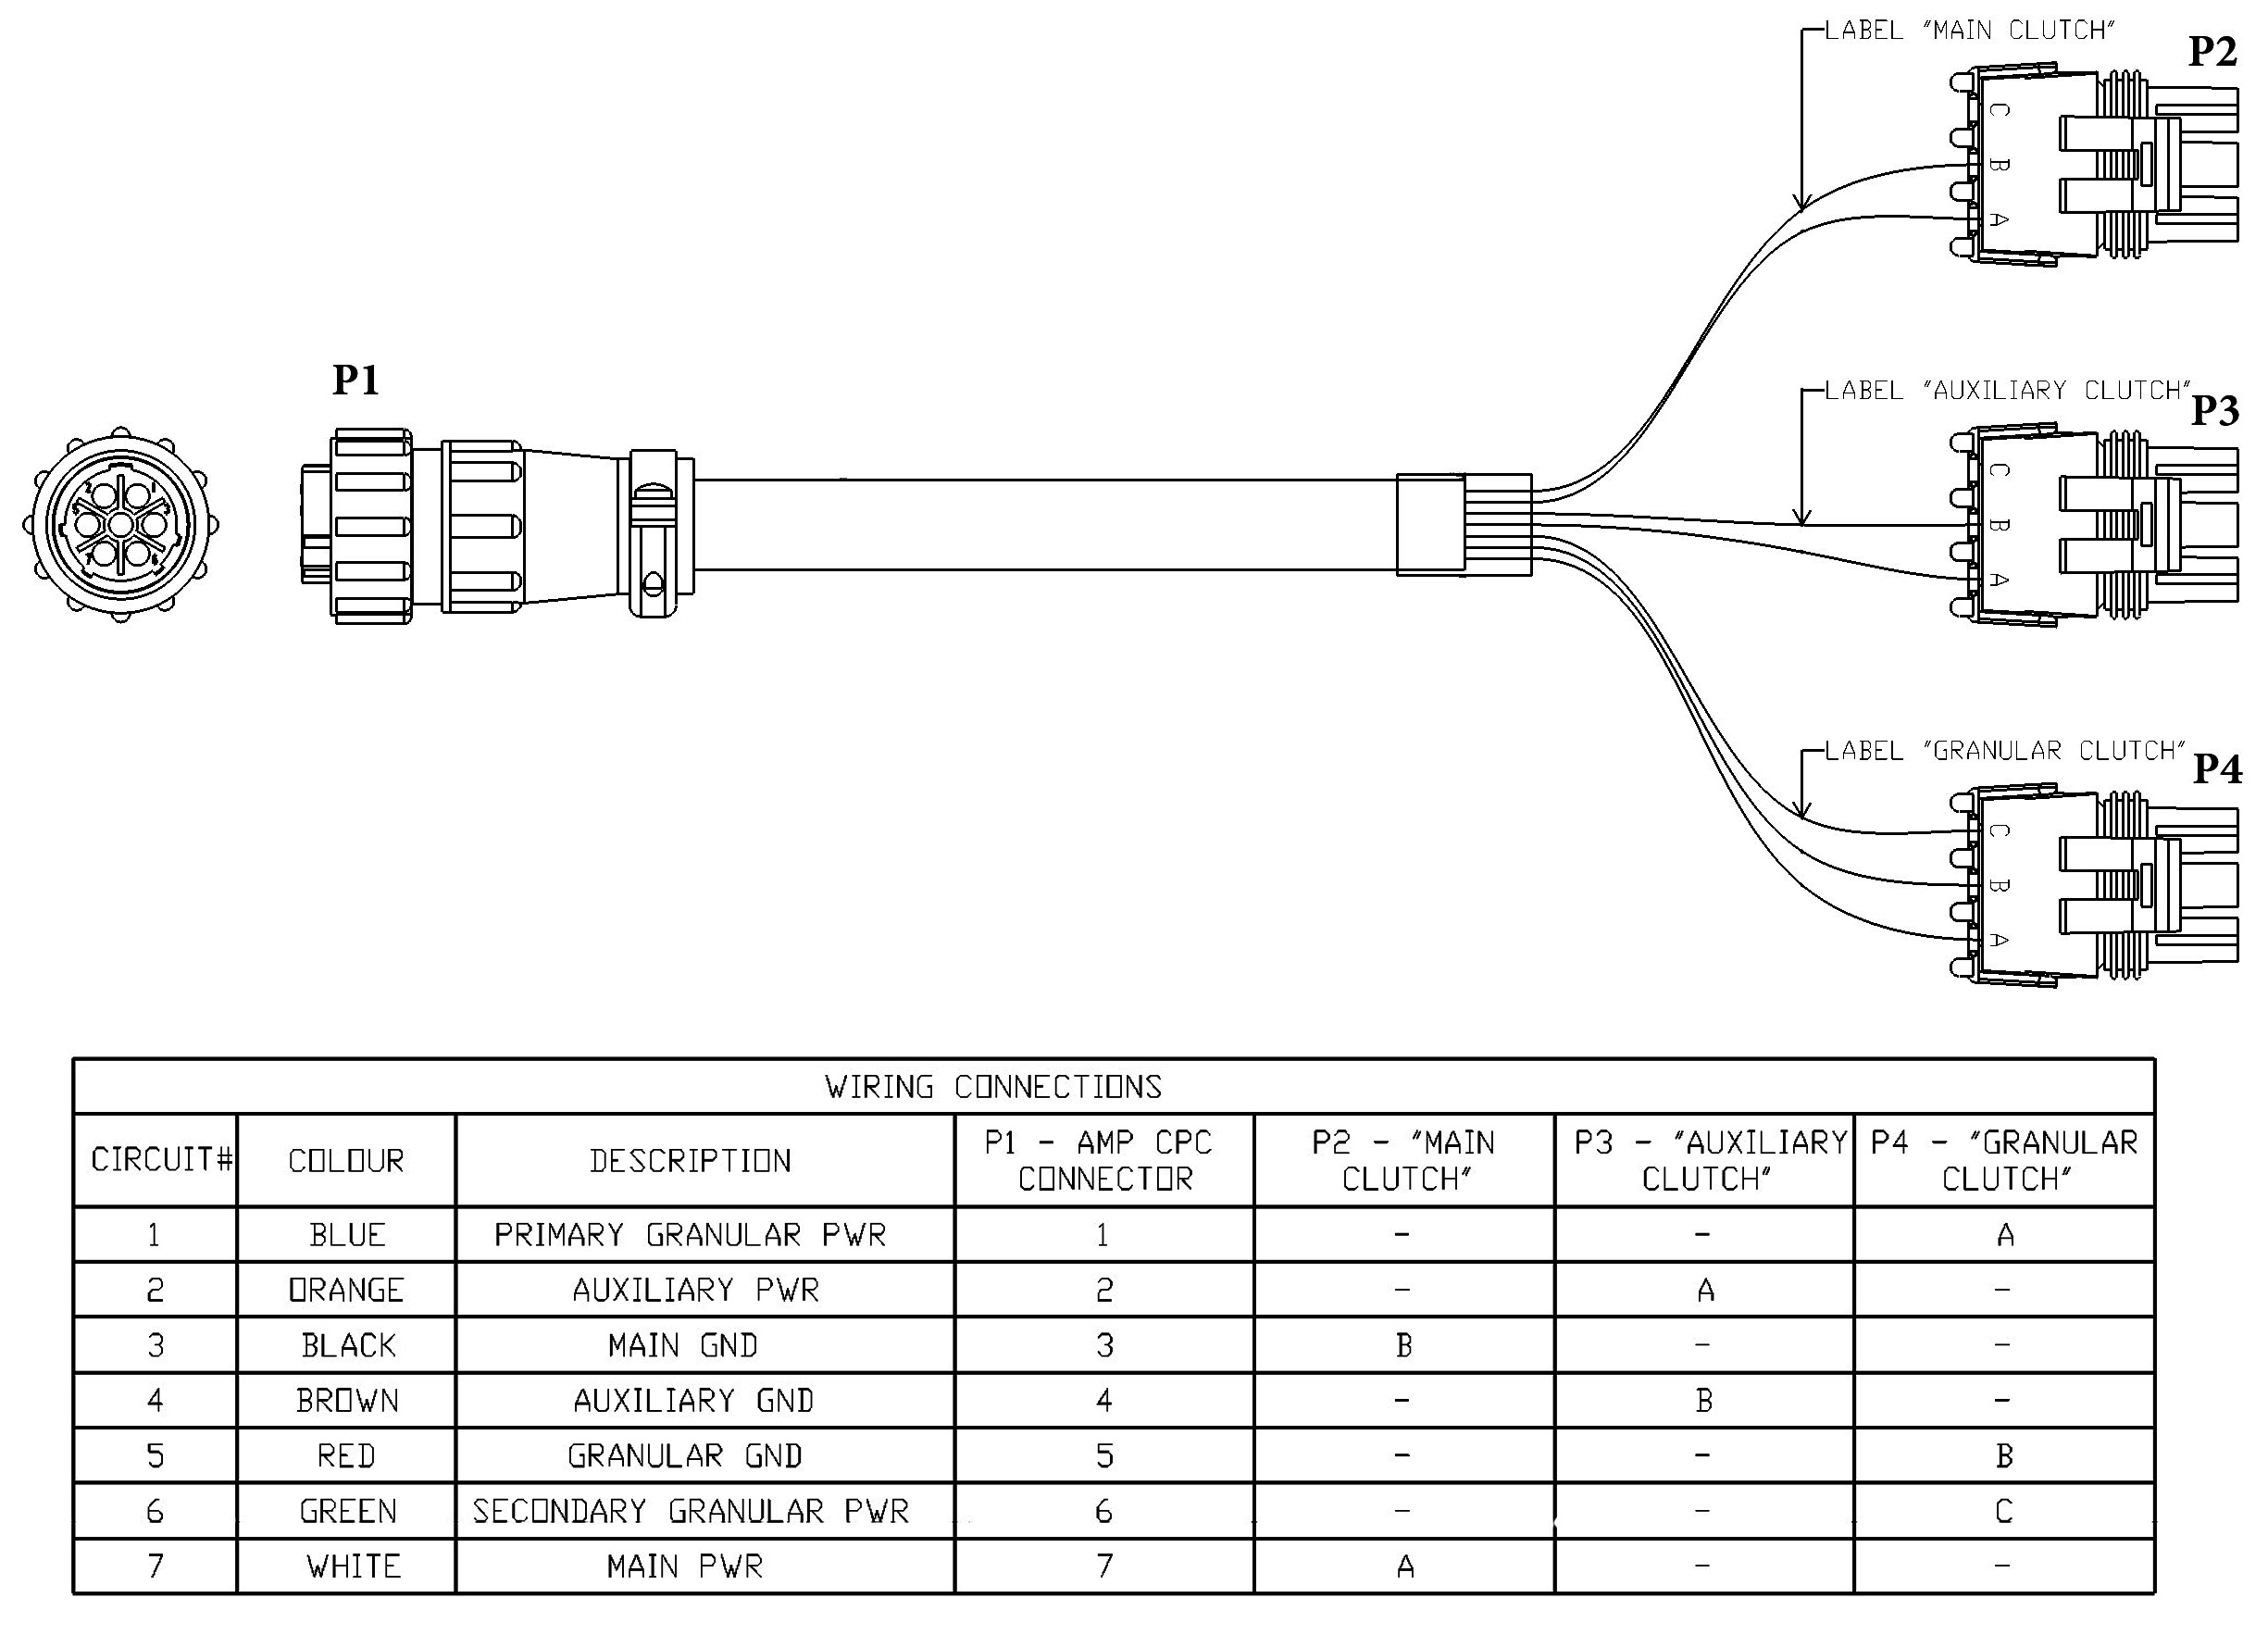
- Note: Wire harnesses use 3 wires. On the plug ends they are marked A, B, and C. Terminal A may be white or red and is the POSITIVE wire. Terminal B is a black wire and is the GROUND. Terminal C is a green wire and is the COMMUNICATION wire.
- Check to see if the continuity is through each circuit on each wire harness. We can test the harness with a continuity tester. Use probes at each end of a colored wire, for example the white wire. If we get the buzzing noise or 100% reading, this is a good wire.
- Continue testing next with the black wire and then the green wire.
- This should be checked on each wire on each wire harness from the tractor to the air cart.
- If there is no reading on a wire, this indicates a bad wire.
- Wire schematics wanted for 6/7/8 and 9 Series Air Carts
- Contact your local Dealer’s Parts Department for parts breakdown.
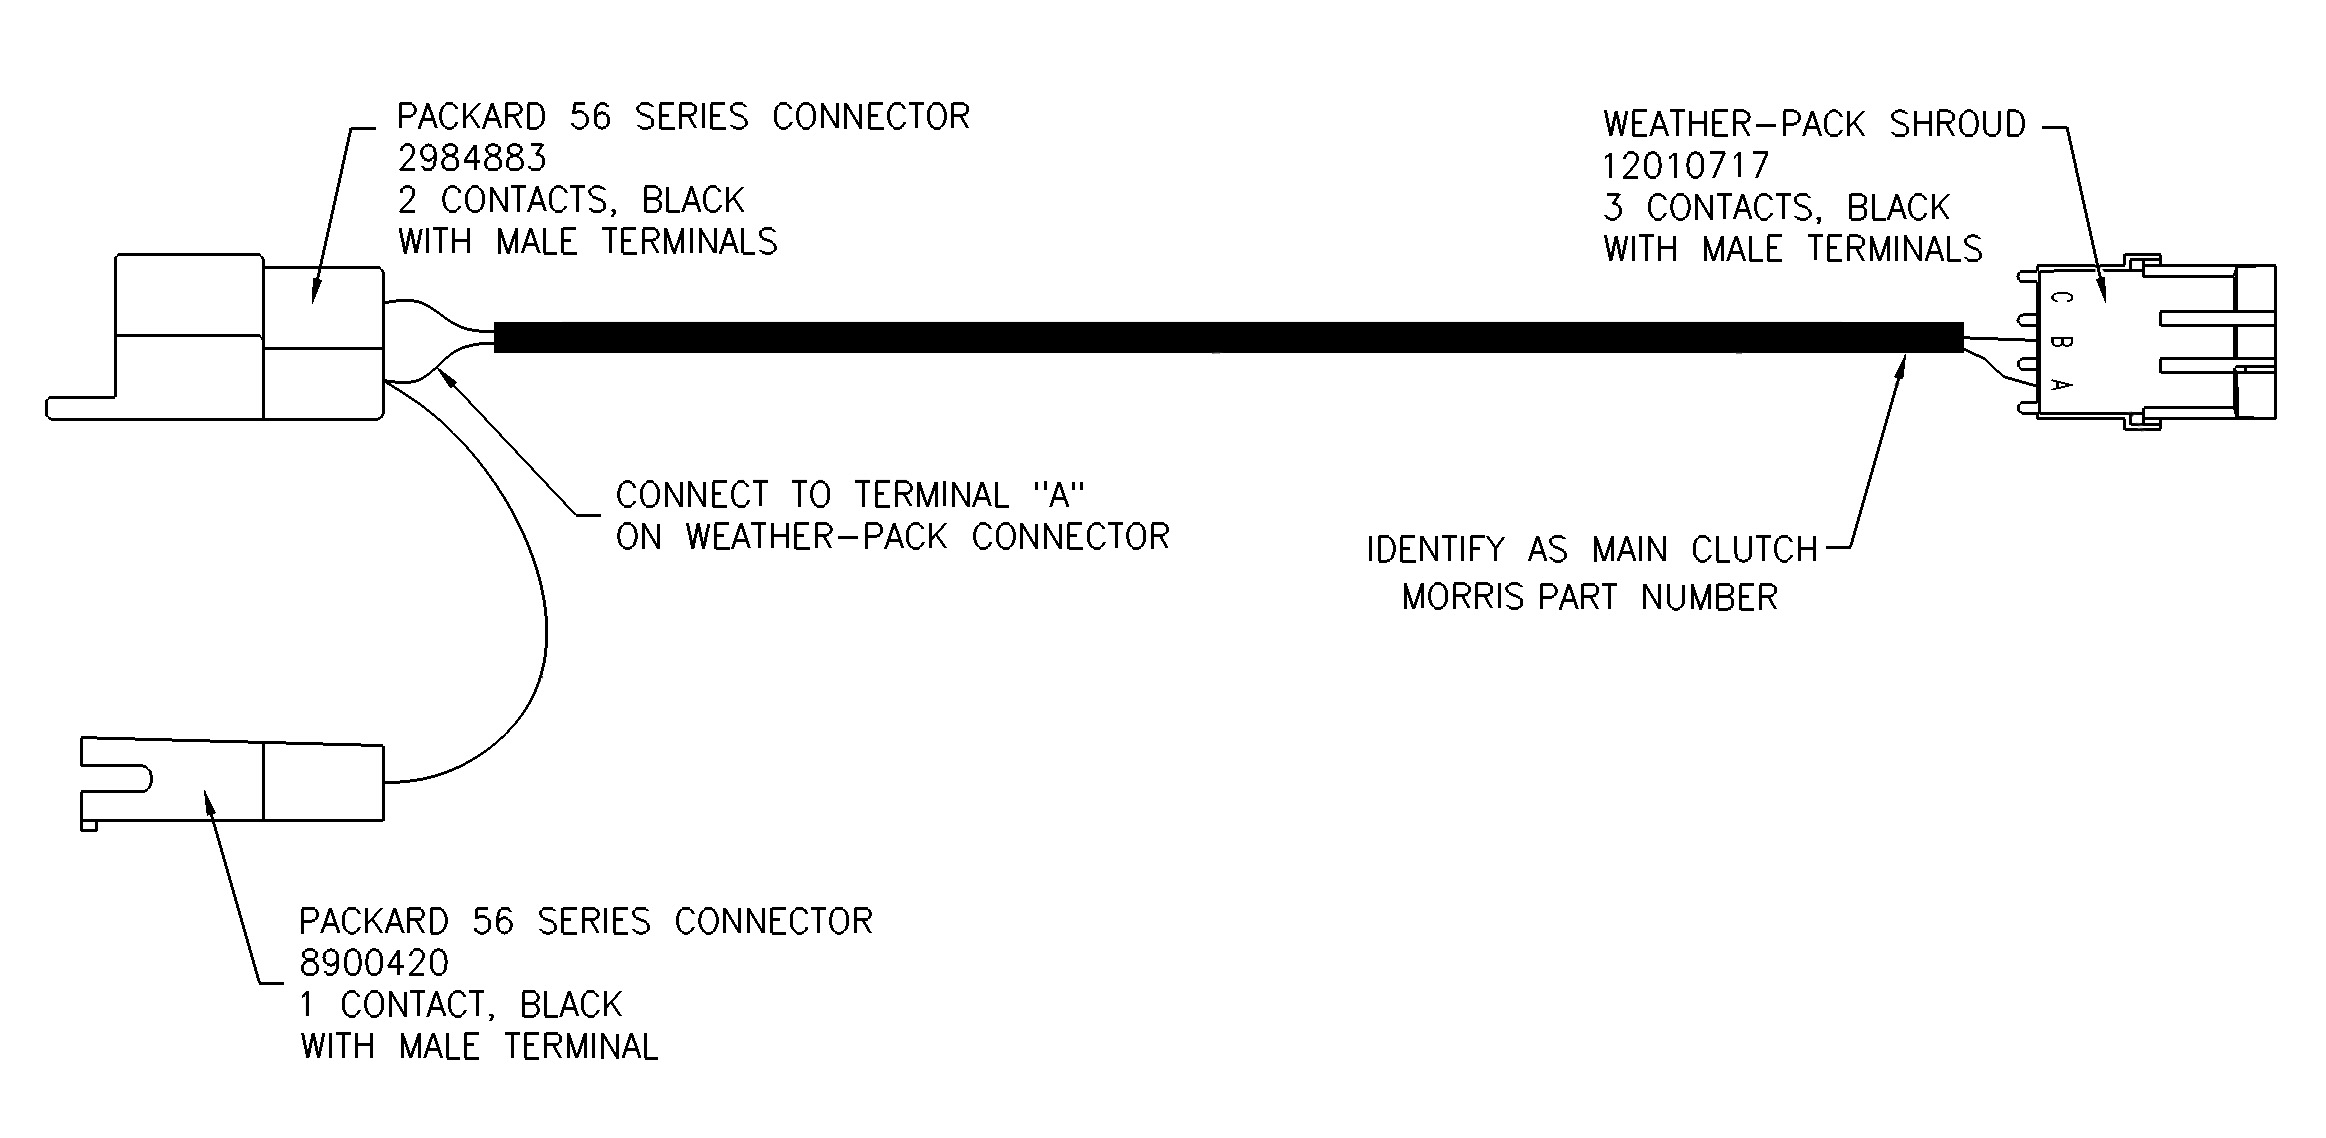
- 9 Series Air Cart Wiring
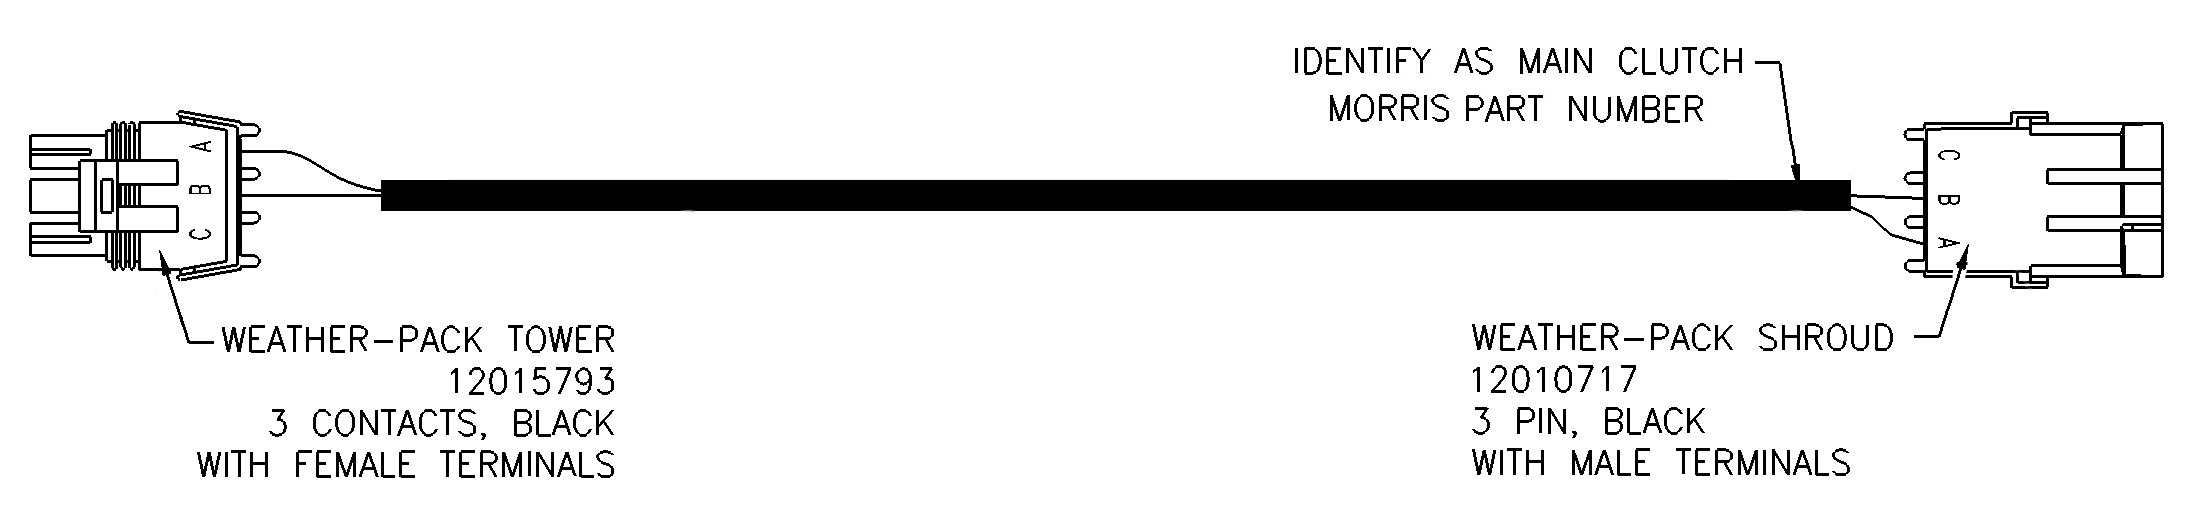
- Main Harness Clutch Wiring
- Harness Main Clutch Part Number N36200
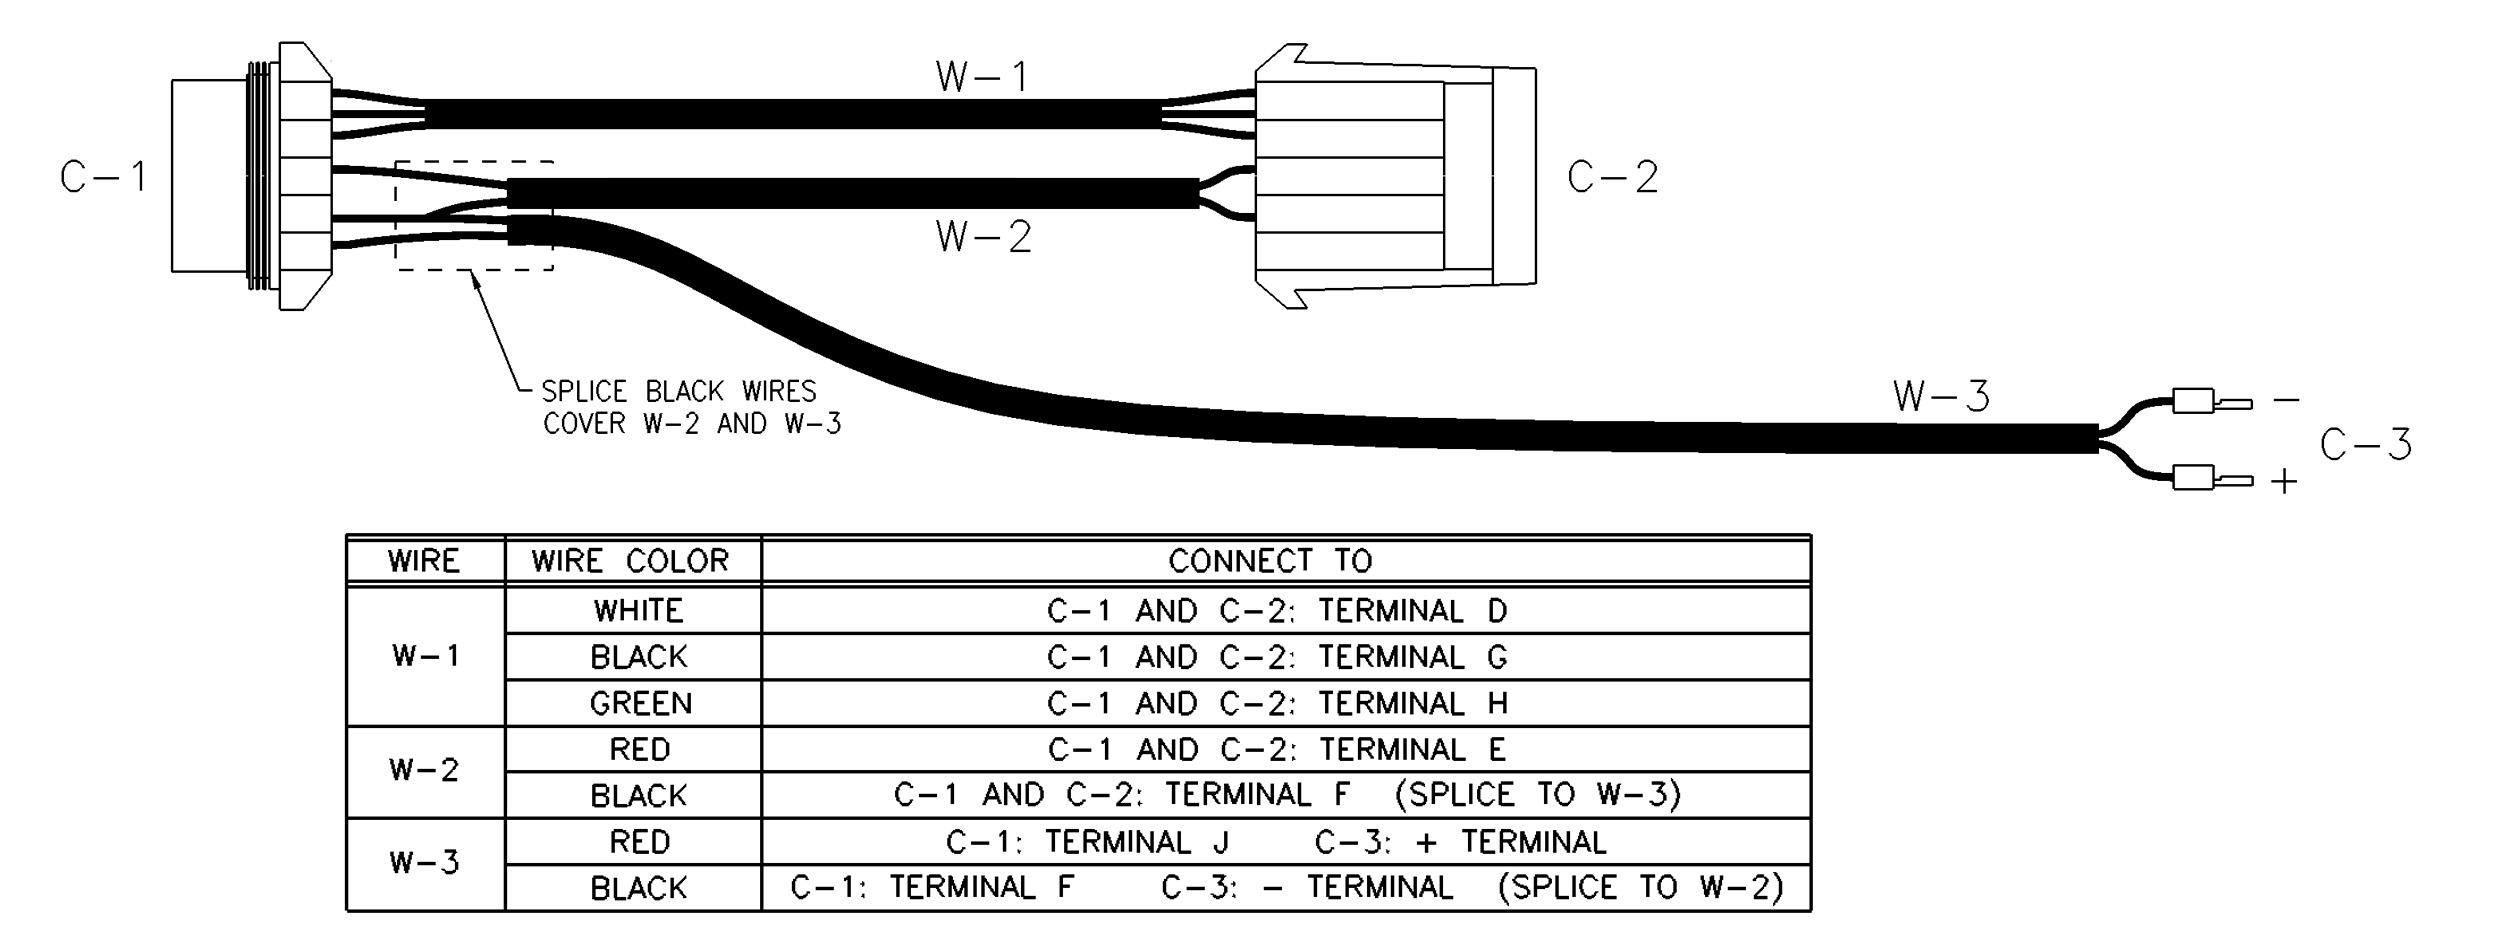
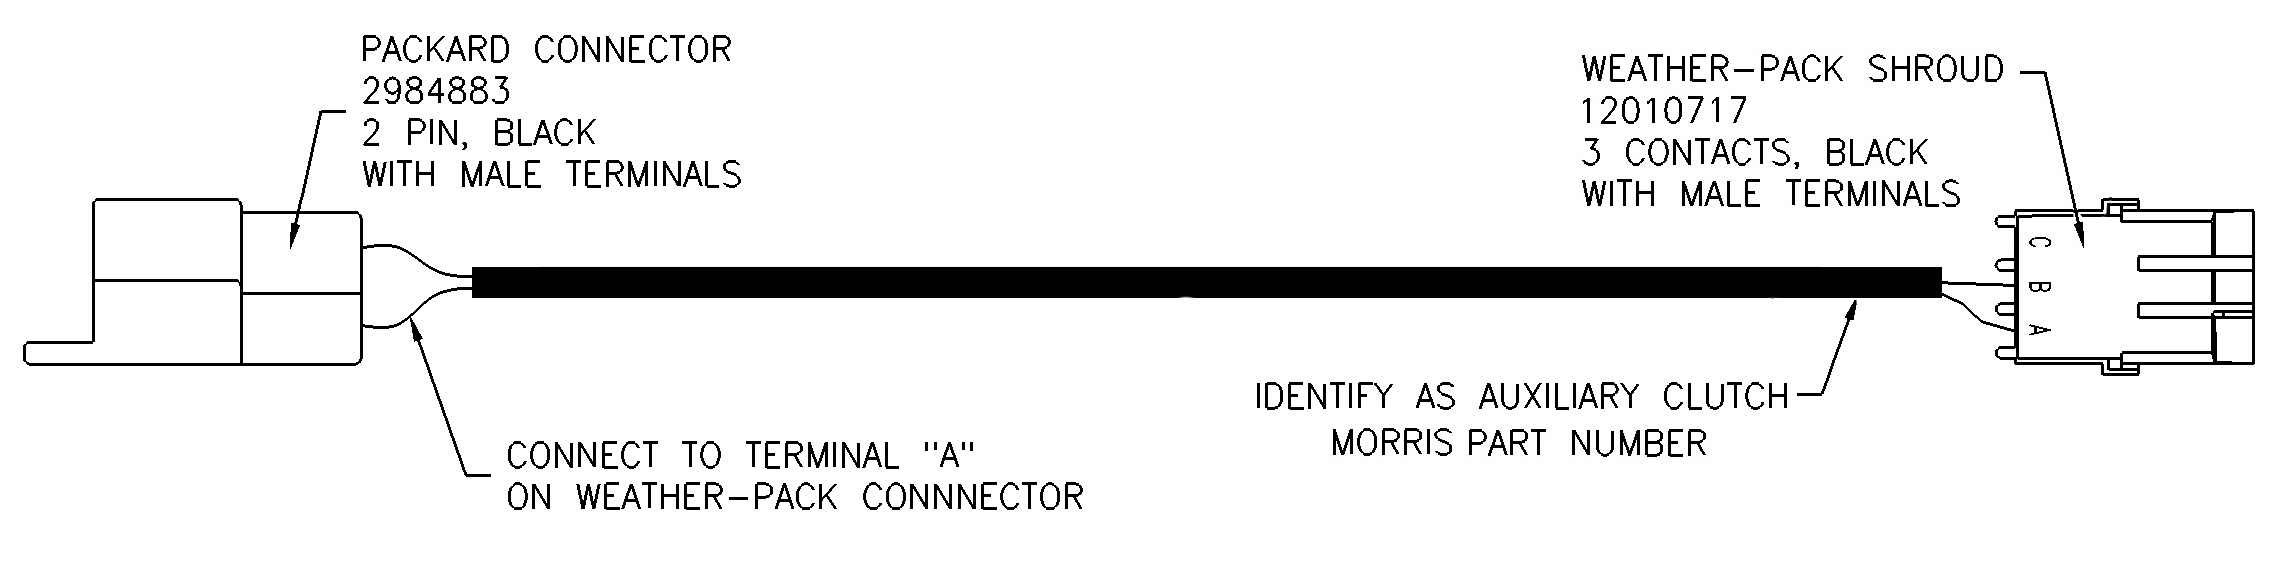
- Vansco Harness Clutch
- Harness Clutch Part Number N32456
- Harness Clutch Part Number N32458
- Harness Clutch Part Number N27012-1
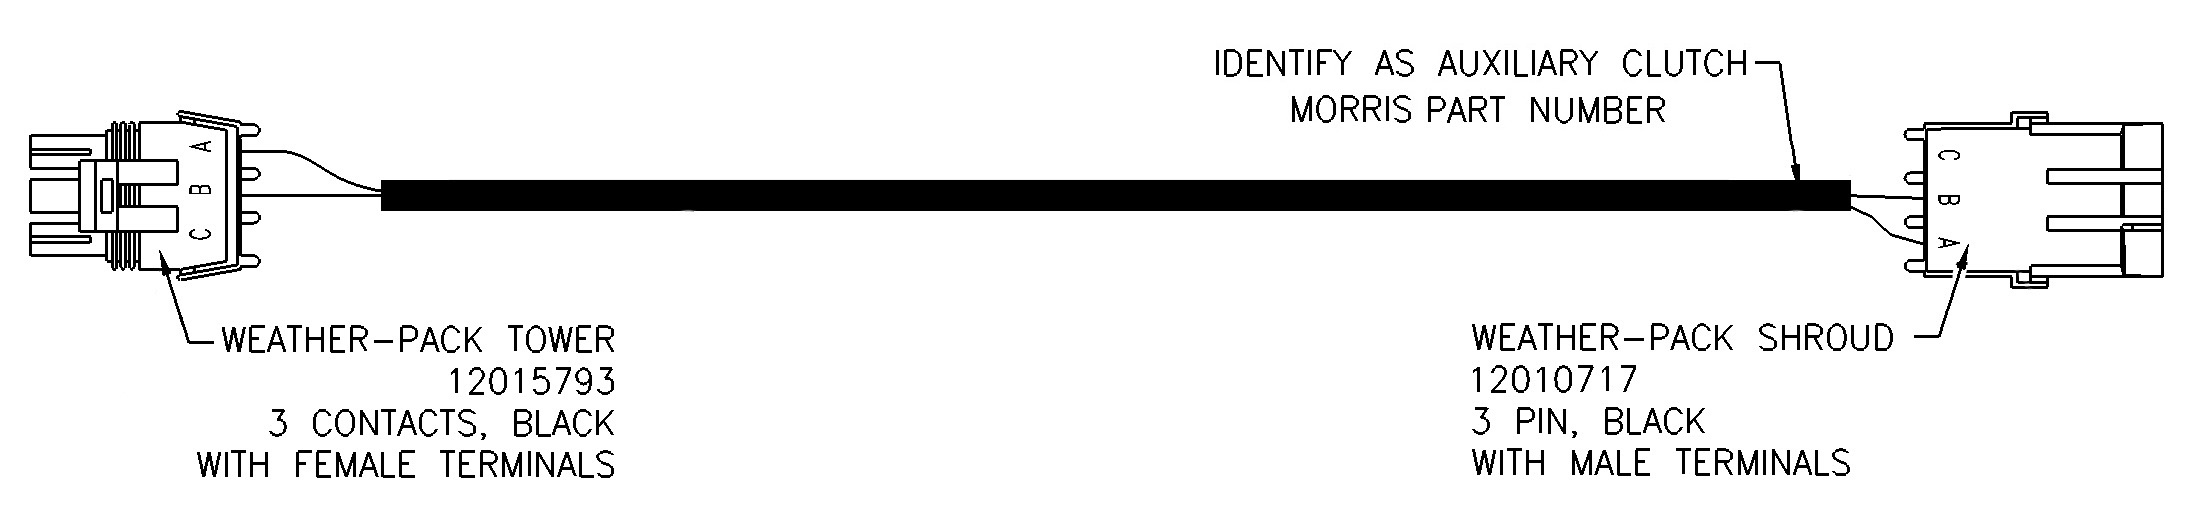
- Harness Secondary Clutch Part Number N37343
- Monitor is reading the acre count even when implement is switched off
- Tillage work switch wires are not hooked together properly. Check that the colours match on plug ends.
- Also, the Y-cable could be hooked up backwards. This Y-cable is located where the drill hooks up to the air cart.
- Hydraulic assist for the conveyor/auger not pairing
- Unhook the power from the control box under the air tank.
- Leave for 10 to 15 minutes.
- Hook the power back up, turn on the remote and hold-down the F1 and reset buttons.
- How to tell the sensors apart
- Fan sensor has a magnet on the end of the sensor.
- Speed sensor has four wires coming off the sensor.
- Shaft sensors have three wires coming off the sensors – green, white and black.
Metering/Trans
- How to change from slow speed to direct drive
- If you look in the transmission bodies you will see a hair pin located in either the smaller sprocket or the larger.
- NOTE: Do not utilize two hair pins as this will damage the meter drive.
- Clutch is slipping
- Check the voltage with the clutch engaged on the back side of the plug. 12.5 volts is required.
- Also check that there is a good clean ground.
- At the beginning of the season there may be a thin layer of rust between the discs. The manufacturer suggests that you drive around the yard with no product and engage and then disengage, up to 10 times, to help burnish the clutch surfaces.
- Metering shaft is hard turning and broke the shear bolt on the drive shaft
- Metering shafts should be checked at the beginning of the season. They should roll by hand and with under 50 in / lbs rolling torque.
- If you cannot do this, disassemble and clean.
- Seed shaft is alarming when driving down the field
- Check the speed sensor to drive sprocket gap on the right hand side of the metering body. This should be at 30,000 or under.
- Relearn sensors to make sure that all sensors are accepted.
- Check that the blue wire on the wheel drive speed sensor is hooked up.
- Meter roll range is jumping in percentages (Topcon)
- This can be the result of restriction on the seed rollers caused by a buildup of fines from fertilizer or seeds.
- Calibration charts do not match the seeding rates
- Note: This is intended as a guide for a starting point. Tire sizes affect the calibration.
- Doing manual calibrations of seed and fertilizer will ensure your seeding rates are accurate.
Air/Flow
- Plugging with product in primary hose
- There can be multiple reasons why you are plugged. Go through this check list.
- Check primary hoses for cracks, breakage and for sag.
- Check air cart for air leakages around tank lid seals, foam gaskets on metering bodies, couplers on primary pipes on cart, and on divider head inspection doors.
- Make sure fan speed on monitor is sufficient for the amount of product being applied.
- When starting in the morning, pre-run fan while tractor is warming up. This allows the air system to dry out. This is necessary because fertilizer causes moisture to be drawn into the system.
- If using double-shoot system, be sure that the air plenum is adjusted correctly. Refer to the Owner’s Manual for product you are seeding as it may be moved.
- Seed treatments that are moist or staining will play a bit of a factor with this problem.
- There can be multiple reasons why you are plugged. Go through this check list.
- Fine seeds are seeding erratic
- Check for air loss around the seals, metering body gaskets, pipe couplers, etc.
- Check for ease of turning of the seed rollers. Fines could be building up from fertilizers and seeds.
- Oats is bridging
- Check for air leaks.
- Peas are plugging the primaries
- At today’s high rates of peas and large seed pulse crops, speed has to be slowed down to less than 4.5 mph.
- When seeding, make sure there is a good stream of air being blown on the pea run.
- Be sure that the seed run is into the ground to prevent air loss. (When using side band openers, it may be advantageous to push the peas through the fertilizer run allowing a direct path into the ground). If using paired row, this is not as much of an issue.
- Fan is not able to achieve full R.P.M.
- Check flow of tractor with flow meters.
- Where to set fan and plenum
- Refer to Owner’s Manual as a starting guide.
Clutch
- Clutch is slipping
- Check for voltage with clutch activated. 12.5 volts is required to engage the clutch.
- Clutch is not engaging
- Check for power and a for a good ground.
- If this is at the beginning of the season, clutch discs may have a thin layer of rust on them. Try to burnish the clutch discs or disassemble and clean or replace.
- Clutch is working but the monitor says it is not working
- Check the power on the clutch engagement that power is able to be switched off, not the ground wire being switched.
- Clutch does not hold 100 ft/lbs of torque on the 7 Series
- Being that this is slow speed application, the manufacturer’s torque is actually 40 ft/lbs.
- Can the 7 Series clutch be replaced with a heavier clutch fro the 8 Series
- Yes
- What voltage is required to run the clutch
- 12.5 volts is required to engage the clutch.
Openers
- One opener keeps dragging back on my Contour Drill
- Bleed hydraulic system for the openers. Refer to Owner’s Manual.
- After bleeding the openers, if the condition persists, it may be best to check for an internal cylinder leakage of the openers. Refer to Assembly School document.
- Openers are dropping from lifted position on my C2 Contour Drill
- Raise cylinders then lower cylinders all the way into the ground.
- Shut tractor off.
- Reposition lever in the tractor to raise the cylinders, then start the tractor.
- Get out of the tractor and engage the hydraulic opener lock valve.
- If the openers continue to drop, there may be an internal leak in one of the cylinders. Refer to the Assembly School document.
- Openers are not running at the same depth, but are set the same on my C2 Contour Drill
- It is important that the opener mount brackets sit secure and tight against the main frame. If there is a gap on the lower rearward side of the mount, the opener will go deeper. Note 1/6th of an inch gap can allow the opener to go an inch deeper. It is important that the bolts are torqued to 170 ft/lbs evenly on each opener.
- Packer Arm Adjustment: Morris has found differences in depths caused by packer arm adjustments. Place openers into the ground and loosen the four bolts on the packer arm mount. When you feel a slight movement, retighten the nuts. Refer to torque chart settings in the Owner’s Manual.
- Opener Pressure does not show on display
- If the screen is black then the transducer on the bottom of the hydraulic accumulator is probably the issue.
- Openers are not staying in the ground
- Bleed opener hydraulic system. If the problem persists, there may be an internal cylinder leakage. Refer to the Assembly School document.
Plugging
- Primary Pipes are plugging quite often
- There can be multiple reasons why you are plugged. Go through this check list.
- Check primary hoses for cracks, breakage and for sag.
- Check air cart for air leakages around tank lid seals, foam gaskets on metering bodies, couplers on primary pipes on the cart and on divider head inspection doors.
- Make sure the fan speed on the monitor is sufficient for the amount of product being applied.
- When starting in the morning, pre-run the fan while the tractor is warming up. This allows the air system to dry out. This is necessary because fertilizer causes moisture to be drawn into the system.
- If using double-shoot system, be sure the air plenum is adjusted correctly. Refer to the Owner’s Manual for the product you are seeding as it may have moved.
- Seed treatments that are moist or staining will play a bit of factor with this problem.
- There can be multiple reasons why you are plugged. Go through this check list.
- Plugging secondary runs
- Check for pinched secondary hoses from the divider heads to the seed boot.
- Plugging on the outside runs
- Again check for air leaks on the air cart, primary hose and divider head inspection doors.
- Check the air equalizers at the couplers between the drill and air cart.
- Plugging seed boots
- Check for the positioning of the secondary hose into the seed boot. If the hose is pushed too far in, it will cause a blockage at the bottom of the boot.
Levelling
Frame
- Contour Drill: My truss rod has broken, can I run with it
- No. These rods are used to help spread the load on the frame. Using this when broken or loose will result in damage to the frame (i.e. cracks developing in the frame).
Sensors
Vansco Sensors
- Is there a way I can tell if the sensor is working
- Yes.
- First, check the gap between the sensor and the pickup wheel. Gap should be no higher than 30,000.
- Next, try to re-learn the sensors. Note: If the system does not recognize the sensor, you have a bad sensor or wiring.
- In the event the sensor is still not working, relocate the sensor. I.e. Bin shaft sensor #1 is not working. Take bin shaft sensor from #2 tank (known to be working), and relocate onto #1 tank shaft. If this sensor continues working on the monitor as shaft 2 (even though it is now on #1 tank), we know that this sensor is working. Therefore, the sensor is the problem. But, in the event that shaft #2 sensor is not working, this would indicate a wiring issue.
- Yes.
Cylinders
- To check cylinders, please see attached document.
Fan
- The oil seal is leaking
- Change the oil seal and make sure case drain is hooked up.
- The fan does not turn
- Check for an oil leak.
- The fan does not run at full speed
- Makes sure lids are closed with no air leaks.
- Check for oil leaks.
- Check hydraulic couplers on tractor which can fail.
- My air flow is not very strong
- Check for cracked hoses, leaking, loose hose clamps.
- Check for plunged divider heads.